Monday, June 25, 2007
The Big Move Has Begun
After a somewhat rough patch where there were a lot of bugs and just general wonky-ness going on at Etsy, it seems like things might be stabilizing (for more info check out the link on the right to the Unofficial Etsy News Blog). That said, I'm finally starting to move all of my chain maille from Beach Bum Creations to their permanent home at Athena's Armoury!!
Sunday, June 24, 2007
Metalsmithing Class #3: Ring Halfway Done

That's the black mother of pearl shell I chose (which is what was giving me problems that first night) instead of the cab like everyone else (silly me). You can also see the short (yet very pretty) decorative trim which was the result of the problems from choosing the shell.
In my last class, I did wind up adding a spitball to connect the trim, but now it looks like a watch face. Hmmm. I might file some of the ball away so it's not quite so big. After getting a nice smooth surface on the bottom of the trim, I put everything together: trim around the bezel and soldered the whole thing to the sheet metal. The next step will be to file the sheet metal so that it bevels nicely against everything else, it should be seamless.
In my next class, I'll get to play with a jeweler's saw as I make the band for the ring. Two people who had gotten that far in my last class snapped three blades and one of them sawed into her thumb! Oh boy.
Wednesday, June 20, 2007
My Fabulous New Lindstrom Pliers
When you make chain maille, you need to use one pair of pliers in each hand in order to twist the rings either open or closed. Some people think that you just pull the connecting ends of the rings apart, but if you do that, you'll lose the circular shape of the ring. If you twist one half of the ring towards you with one plier and the other half away from you with your other plier, you can then close them (going in the opposite direction) and keep the ring in it's shape.
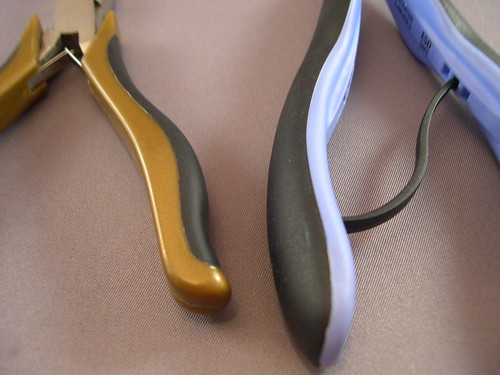
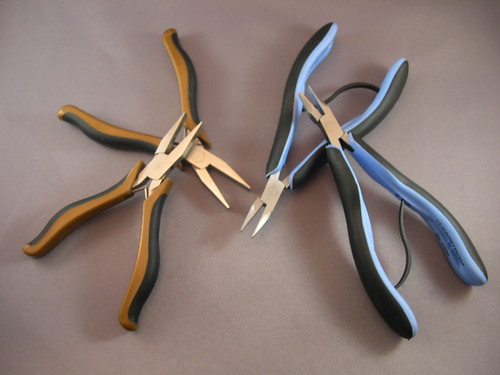
I first started making maille with a pair of chain nose pliers: picture your average every day joe pliers, except a bit shorter and non-serrated (non-serrated means without teeth which is important so that you don't mar your metal). I wasn't too crazy about these pliers because it felt like I didn't have enough control over the rings (lack of surface area). I wanted to try a pair of flat nose pliers and my carpenter boyfriend suggested getting some from Craftsman (the gold ones in the photos).
The problem I was running into with these guys was the notch on the handle. It literally kept bruising my palm and then I would lose weaving time because I wanted to try and let it heal a little bit. Poor Scott started to feel bad since he was the one who recommended them to me.

Connie Fox's website. She's got lots of fabulous wire working supplies, decent prices, great customer service, and quick shipping. Needless to say, I found what I was looking for and on sale, no less! It had been about a week and I hadn't gotten around to ordering yet. But, in that time, little did I know that Scott went ahead and ordered my fabulous Lindstrom Flat Nose Pliers from her already and asked her to not fill my order (when and if I would ever get around to placing it) because he wanted to give them to me for a present. She was way cool and said no problem.

So now I've got my fabulous new Lindstrom pliers that I just love. The grips are longer allowing for better leverage (and no notch!), they have way more cushion, and you can even adjust how much the jaws open! I love them!
I first started making maille with a pair of chain nose pliers: picture your average every day joe pliers, except a bit shorter and non-serrated (non-serrated means without teeth which is important so that you don't mar your metal). I wasn't too crazy about these pliers because it felt like I didn't have enough control over the rings (lack of surface area). I wanted to try a pair of flat nose pliers and my carpenter boyfriend suggested getting some from Craftsman (the gold ones in the photos).
The problem I was running into with these guys was the notch on the handle. It literally kept bruising my palm and then I would lose weaving time because I wanted to try and let it heal a little bit. Poor Scott started to feel bad since he was the one who recommended them to me.

Connie Fox's website. She's got lots of fabulous wire working supplies, decent prices, great customer service, and quick shipping. Needless to say, I found what I was looking for and on sale, no less! It had been about a week and I hadn't gotten around to ordering yet. But, in that time, little did I know that Scott went ahead and ordered my fabulous Lindstrom Flat Nose Pliers from her already and asked her to not fill my order (when and if I would ever get around to placing it) because he wanted to give them to me for a present. She was way cool and said no problem.

So now I've got my fabulous new Lindstrom pliers that I just love. The grips are longer allowing for better leverage (and no notch!), they have way more cushion, and you can even adjust how much the jaws open! I love them!
Saturday, June 16, 2007
Great Business Week Articles
There were a couple of really great articles in Business Week recently. One was featuring Etsy! Hopefully this article will be good exposure for the site and we will see even more traffic. You can find the article here: http://www.businessweek.com/smallbiz/content/jun2007/sb20070611_488723.htm?chan=search.
The other article is entitled Bringing Your Art to the Online Market and includes some advice on how to get products the most exposure on the web. It also has a few great sidebars about women entrepreneurs -- very inspiring! You can find that article here: http://www.businessweek.com/smallbiz/content/feb2007/sb20070226_390211.htm
The other article is entitled Bringing Your Art to the Online Market and includes some advice on how to get products the most exposure on the web. It also has a few great sidebars about women entrepreneurs -- very inspiring! You can find that article here: http://www.businessweek.com/smallbiz/content/feb2007/sb20070226_390211.htm
Thursday, June 14, 2007
Metalsmithing Class #2: Starting My Ring!!
Last night I got to start my first official project in my metalsmithing class: a cabochon bezel set sterling silver ring. Susan took out a whole bunch of stones and asked us to pick our favorite. I chose a black mother of pearl, which of course is a shell and not a cabochon (a cabochon, or just cab, is a stone with a flat surface on one side and a round or dome shape on the other). It didn't dawn on me at the time that the lack of surface area might make it a bit more of a challenge to work with. . .
This ring will consist of four parts plus the stone. There is the bezel (which is the metal that holds the stone in place); there is a decorative trim which will be added around the bezel; the sheet metal shaped to be the backing to the stone, bezel, and trim; and the wire which forms the actual ring portion that goes around your finger.
The first two parts (the bezel and the trim), we already know how to make from last week's lesson. As for the challenge I mentioned earlier: with the lack of surface space, the shell kind of moves around a lot. That made it more difficult for me to get an accurately sized and shaped bezel. In addition, the wire used for the bezel is fine silver and not sterling. Fine silver does not have any copper in it and, thus, is very, very soft. I'm used to working with malleable metals (and some not so malleable metals) with my maille, but nothing quite as soft as this, so it took me a little bit of time to get used to working with it.
After a whole bunch of filing and shaping, I had something I thought would work and got down to soldering. I gotta tell ya, the soldering is the easiest part. I love the soldering. Not because of how easy it is, but because it's so cool: there's some metallurgy involved, you get to play with a torch, and, well, the colors of the flame and the metal as it changes is really pretty.
Next, I got to work on my trim. For my trim I chose a half round twisted wire -- it looks really cool. As opposed to the bezel, the trim was much harder (as in the opposite of malleable, not the opposite of easy -- then again, I guess either definition applies). Work hardened from twisting, maybe? So, I was trying to shape a somewhat harder wire around a very soft wire and found myself denting, marring, and misshaping my so nicely formed bezel. Luckily, I should be able to reshape the bezel and, hopefully, the mars will either come out or be hidden by the trim. In my attempts to get two flush edges on a half round twisted wire (I really need to get a picture of this in so you understand) I filed away a little too much wire. I walked up to Susan and showed her my problem. She didn't say that I made a mistake and needed to get some new wire. No. She pulled out this little container and suggested I add a spitball to connect the ends. (A spitball is basically someone else's oops when they melted their metal.) I was so excited! I made a booboo and it's going to turn into something totally cool! My stone/shell and trim are going to be unique, but I also get this additional little something. (She also mentioned that I chose a difficult project because of the shell vs. cabochon thing. Gggrrrrr.)
Well, that's as far as I got last night. Next week, I'll be soldering the trim with my groovy little spitball and moving onto the shank and, hopefully, the wire ring portions. After that, the only thing left to do is set the stone/shell and possibly polish. Susan said that this whole project should take about six to nine hours for a beginner (which equates to two or three classes), about three hours the second time you try, and one hour with experience. So fun!!
Monday, June 11, 2007
What's in a Name?

A very nice fellow Etsian made this banner for me recently. I really love the graphic: the warrior goddess image very much resembles descriptions of Athena with the deep set eyes, long neck, the nose extending from the forehead, and her helmet worn high on her head like a hat.
When I first opened shop at Etsy, like so many others, I had numerous projects going on and wanted to keep the name somewhat ambiguous to apply to both myself and the many things I was doing. As I've become more and more obsessed with chain maille, I've decided to open up a second shop solely for my maille with a name I found to be more appropriate to the art.
Many people know of Athena as a goddess of war and wisdom. What many people don't know is that she's also the patroness of crafts; among them, metal-working: seemed like a good fit for my shop.
So far as the armoury part of the shop name goes: well, let's face it, chain maille is armour. Whether it be combat or costume armour or jewelry made using the same weaves, it's all still based on the armour of long ago.
I'm about to start transferring my chain maille items from http://BeachBumCreations.etsy.com to http://AthenasArmoury.etsy.com!! Beach Bum Creations will still exist for other kinds of jewelry, supplies, candles, hemp, etc., but all maille will be in Athena's Armoury.
Wednesday, June 6, 2007
First Metal Jewelry Class
I just got home from my first metal jewelry class and it was awesome. The teacher's name is Susan and not only is she knowledgeable, but also very cool: apparently, food and adult beverages are welcome. Which actually sounds a little bit like a scary combination considering we're working with torches and pickle (an acid solution that can burn holes in your clothes, not to mention what it can do to your skin).
Tonight, we went through the basics: identifying tools, safety, physics. Yes, physics. I don't think everyone that signed up for the class knew that there'd be science involved. We even eventually got to start soldering. The soldering we did was not really a project per se. We used half round sterling silver wire to make what resembles a ring. Susan didn't want us to call it that though, because it was simply a lesson to learn how to solder one end of a piece of metal to another. Mine came out nice and round, but I ran out of time to finish polishing and buffing the mars out. Then again, maybe I'll make the mars "artistic" by taking a hammer to it. I really think that the strength I've gained in my hands from doing chain maille benefited me tonight.

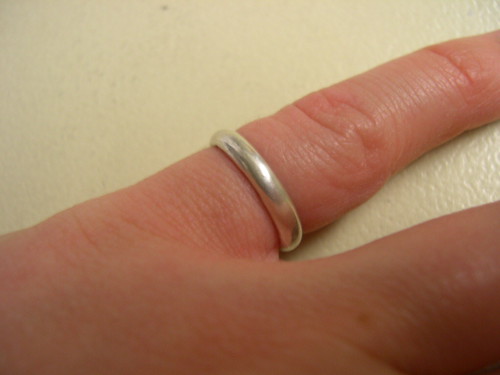
I know this isn't a fantastic picture, but I'm very proud of my first soldering project! I used a torch for the first time! Woohoo! I just hope that I don't forget everything I learned by next week.
Tonight, we went through the basics: identifying tools, safety, physics. Yes, physics. I don't think everyone that signed up for the class knew that there'd be science involved. We even eventually got to start soldering. The soldering we did was not really a project per se. We used half round sterling silver wire to make what resembles a ring. Susan didn't want us to call it that though, because it was simply a lesson to learn how to solder one end of a piece of metal to another. Mine came out nice and round, but I ran out of time to finish polishing and buffing the mars out. Then again, maybe I'll make the mars "artistic" by taking a hammer to it. I really think that the strength I've gained in my hands from doing chain maille benefited me tonight.

I know this isn't a fantastic picture, but I'm very proud of my first soldering project! I used a torch for the first time! Woohoo! I just hope that I don't forget everything I learned by next week.
Friday, June 1, 2007
Working on the Coif!
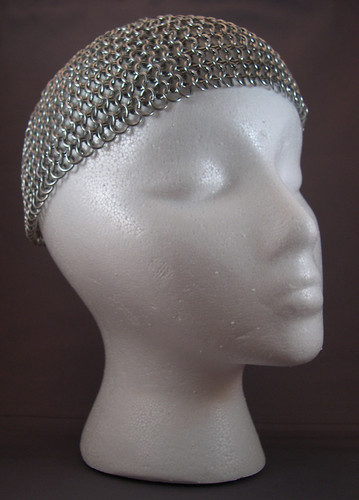
I keep telling everyone that the opening of my second Etsy shop is contingent upon the completion of a fairly sizable maille project. It's my first ever coif. Here's the first pic from the work in progress:

This is the beanie or skullcap portion. All of the expansions in order to get it to the right size to fit around my head are in this section. It was a bit time consuming because I was figuring out expansions for the first time and, well, there's nearly 1,000 rings in this section alone. It's still got a long way to go: neck covering, throat closure, mantle. . .
With the exception of making some juggling balls, all of my maille projects to this point have been jewelry, so it's been a blast to be making something so big. I can't believe that I'm constructing a fabric made out of metal mesh. I'm making armour. So cool.
Subscribe to:
Comments (Atom)
