Thursday, July 12, 2007

My Work Space, AKA My Dining Room Table

There are as many unique work spaces out there as there are unique artists who occupy them. Some use their kitchen/dining room table (like me), some their couch and coffee table, some a tray on their lap, some are even lucky enough to have a work bench or even a studio. I love getting a sneak peek into everyone's "studio." I know it's kind of voyeuristic, but I truly love to see how everyone works, get ideas for my own space (if I'm ever lucky enough), see their tools and materials.

For now, my work space is my dining room table. As many of you in a similar situation knows, sometimes you're lucky enough to be able to leave your materials and tools out and set up mid-project. Then there are those times that your boyfriend wants to have his friends over for a full day of gaming. Well, maybe not exactly that situation, but I think you get the idea. Mid-project or not, you have to clean everything up.


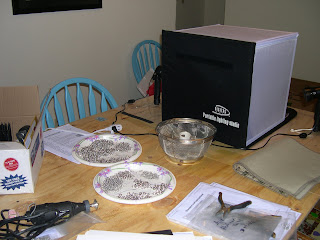
The above photo is of my kitchen table which in actuality is in my dining room, aka my work space. The plain wood table top you see is something that Scott (the boyfriend) built to give us a bigger table space: it's basically a piece of plywood that sits on top of the actual table with a frame so it doesn' t move; it also folds in half for storage. On the bottom left is Scott's Dremel tool which I have kind of pirated away from him to use with my Koil Kutter for cutting jump rings. You can see a batch of freshly cut rings as well as a strainer in which I rinse all of the lube off of them. My Craftsman pliers are out (this pic is obviously from before Scott gave me my beautiful Lindstroms) as well as some mandrels used for coiling. In the background, you can see my light box. This was not one of my more organized days, but then it's always difficult to stay organized in a temporary space.

Here's another shot of my work space. You can see in the background the storage cabinet that Scott and I share and a set of plastic drawers that contain some more jewelry making supplies; my tackle box with even more supplies and tools is on the floor between the two.


On top of the cabinet are two projects: one belonging to me and one belonging to Scott. The grey box laying down is his: it's a dice tower that he built from scratch with wood and felt. You throw dice in and it tumbles them up and then they come pouring out the bottom. It's really quite neat.

The other project is mine, of course: a work in progress coif. In this photo it looks kind of like a wig and I'm thinking of making more like this except in fun colors for all of those punk girls out there. Since this picture has been taken, I've finished it off and must admit, I've been slow to get pictures posted of her all done up.

Scott and I are in the process of trying to buy a house and if any of you have not been through that experience, imagine the most stressful time of your life and multiply it by a thousand. In any event, if all goes well, our new house will have three bedrooms. One of course is for us to sleep, and we were originally planning on having an office for us both in one and a guest bedroom in the other. Recently, we've been playing with a new idea that I think we've both fallen in love with: we're each going to get a room to do with as we please. If we decide to go this route, I'm going to have my own office/studio/workspace!! And then, of course, I'll have to add a new post with more pic's!

Wednesday, July 11, 2007

Florida Etsy Street Team is Being Organized!

I was reading through the Etsy Forums yesterday and saw a shout out to any Floridians in the Street Team Section. As we got to talking, we realized that there are currently street teams for Northern, Central, and Southern FL, but none of them really seem to be active. This led PaperScissorsArt to call for a chat last night to discuss how we would all like to go about organizing a Street Team that covers all of Florida. Check out Paper's Street Team Section post as well as her blog entry for an update on last night's chat and details if you're interested in taking part in the team. There's lots of great stuff planned already!

Personally, I'm very excited about this opportunity. I'm very much interested in being involved with the Etsy community as well as the opportunity to network, support, and get to know other Etsians around me. Plus, I'm in Clearwater, so it works out well!

I'm also a member of the fairly new Etsy Bloggers Street Team and am having a blast with that one, too. Check out the Etsy Bloggers Street Team Blog (of course we have one!) and the Etsy Bloggers Street Team Profile at Etsy if you're interested in joining that group. So far, we've had one group writing project (orange for Etsy) and are starting to do a weekly blog carnival with this week's writing project (subject: your studio/workspace).

Friday, July 6, 2007

Will Copper Turn My Skin Green?

Personally, I love copper. I love it when it's bright and shiny and even after it starts to oxidize and get darker. There's a bit more weight to it than bright aluminum or even sterling silver and has such a beautiful warm glow. I love mixing it with other metals for a two tone look. Also, I'm not an expert, but there is a lot of anecdotal evidence to suggest it might help people reduce the pain of arthritis.

I do get a lot of questions and comments from people about whether or not copper will make their skin turn green. Copper oxidizes by darkening and then turning green, just as sterling does so by tarnishing and iron does so by rusting. It's a natural process and the environment determines how quickly it happens. It happens faster in high humidity, but the speed of oxidation is also affected by the body chemistry of different people. Some people wear copper every day and it never turns green, some people wear it and it turns in one day. Some people can turn sterling dark in one day, too. We're all different in that way. I guess I'm lucky, because it actually takes quite some time for copper to even begin to show signs of oxidation for me and it also doesn't turn me green, so I get to enjoy wearing this lovely metal!

If you check out my last post, you'll find a quick, easy way to clean your copper if it does start to oxidize. Enjoy!

Tuesday, July 3, 2007

Etsy Bloggers Street Team Theme: Orange

I've been racking my brain trying to think of a fantastic project I can do using orange jump rings or O-rings, but not having any in stock at the moment put a serious damper on that! But then, I realized that I already have some orange already in both of my shops! I've got some orange pendants in my original Etsy shop, Beach Bum Creations.


But, even more exciting than supplies is something that I've made. Although, not really orange, copper's as close as I've got! You can find this Mobiused Rosette Bracelet in Athena's Armoury, my new shop for chain maille.


That's probably one of my all time favorite bracelets. I made one for myself and always get compliments on it. It was made using 18 gauge copper rings with, I believe, 1/4" inner diameter. It's a variation on the classic Euro 4-1 chain maille weave (most commonly seen in armour).

Cleaning Copper
I've had mine for quite some time now and it's starting to get a little dull, but that's easily fixed. Just mix together some lemon juice and salt, add bracelet, then slosh around a little bit. However, you must make sure you rinse it off!! The salt will make the bracelet crusty if you let it sit and the acid in the lemon juice will eat away at the metal. If you want to make extra certain it's clean of the lemon juice solution and perhaps keep the shine a bit longer, you can make a paste with baking powder and water and rub it on the copper. This will neutralize the acid. Then, of course, rinse again and dry. Beautiful, shiny copper once again!

Metalsmithing Class #4: So Close to Being Done!

OK, so lots of people, not enough tools, and a few snafus later and I'm not quite done with my ring yet. I really thought that myself and two or three other people were going to be able to finish them off last week, but it just didn't happen. Oh, well!

I finished getting the back of the ring face (which, coincidentally looks more like a watch face with that big ole spitball that I had to add) nice and shiny since this was the last opportunity I'd have to get at it without anything else in the way. Then, I took the band that I made in our very first class and sawed it open at the solder joint. Thank you to everyone who warned me to wear my safety glasses while sawing. A couple of people in class got a little giggle out of me, but I'd rather that than lose an eye! I did break the blade, by the way. It didn't snap back and get me, though! Oh, and I did saw into my thumb, just a little bit, too (it didn't even bleed). Weeeeeeeeeeeee!

It was after this part that I got into a little bit of trouble (well, more trouble). I was supposed to saw about a half an inch long up the center of either side so that it was a pretty V shape where it attached to the ring face. Well, for some reason when I sawed, I veered to the right and thus made one side of my V quite a bit skinnier on one side than the other. I saw that it didn't look good, but didn't truly realize my mistake until a couple of steps later.

I wrapped the wire around a ring mandrel and shaped it to my size, taking into account that the ring face would actually be a portion of it. Well, when I went to file down the ends to get a nice flush surface in order to solder it, is when I really realized the sawing mess I made. Once I started to file, one side of the V bent back. Oops. Susan said, "No problem. You'll just attach it with a V shape on one side and the other side will be soldered in the space in between." Cool, again, I'll be making a mistake into something unique and neat looking. So, I went back to filing and trying to get my nice flush surface. The same thing happens with the V on the other side of the band. Ggggrrrrrrrrrrr. I show Susan. "Well, it will work, it just won't look as cool." Insert sad face. Here it is after the soldering:


I needed to use a third hand in order keep the band from falling over: after I got through filing it, it was just a little too thin to stay upright on it's own.

Next step will be polishing and making it shine like a mirror. Then, I'll get down to business getting that shell in place. With any luck, I'll be able to finish it this week, but who knows what will happen next! Plus, this week's class is on the 4th of July, so we'll probably be a little bit more raucous than usual. Someone mentioned bringing in sparklers. I wonder if I should bring in a lighter so we don't have to use the torch to light them. . . =)