Showing posts with label beachbumcreations. Show all posts

Friday, March 7, 2008

Craft Fair Tomorrow!


Sneak Peek from my living room.

If you happen to be in the area. . .

Athena's Armoury will be participating in the Grand Opening Celebration and Craft Fair for Kids Kottage in downtown Safety Harbor, FL on Saturday, March 7. Kids Kottage is a resource in the community for families, businesses and artists. No child will be charged a fee for accessing any of their services. The celebration includes games, live music, food, archery, and . . . a trapeze act?!

The address is 255 5th Avenue South, one block south of Main Street. The craft fair will be open from 9:00am to 3:00pm with the rest of the event going from 11:00am-3:00pm.

Hope to see you there!

Thursday, November 29, 2007

Wednesday, October 24, 2007

Buy Handmade for the Holidays

I just took the pledge to buy handmade this holiday season. Will you?

I Took The Handmade Pledge! BuyHandmade.org

From the Buy Handmade website:
Buying handmade is better for people, better for the environment, and better for giving truly special and well-crafted gifts. The ascendancy of chain store culture and global manufacturing has left us all dressing, furnishing, and decorating alike. The connection between producer and consumer has been lost. Buying handmade helps them reconnect.

We encourage all consumers to be aware of the social and environmental implications of their purchases.

Thursday, October 18, 2007

For a Good Cause: Charity Gems

I just listed in my Beach Bum Creations Etsy shop, my first charity item. It is the Think Pink Breast Cancer Awareness Bracelet. All profits from the purchase of this bracelet will go to benefit Susan G. Koman for the Cure.


There are earrings to match coming as well as other items to benefit other great causes. Check back soon!

Wednesday, October 3, 2007

Custom DIY Necklace Kits

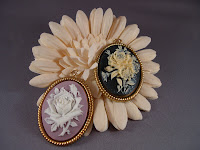
I've been playing around with the idea of listing some DIY Necklace Kits at my other Etsy shop: Beach Bum Creations. I finally listed one today for Scott's mom, Jean. A while ago, I showed her the basic bead stringing techniques and, needless to say, being the creative woman that she is, she got hooked. At her request, I put together a kit with Cameo pendants, enough strands of beads to make the necklaces nice and long, seed beads to match, gold findings, as well as some stringing tools (chain nose pliers and wire cutters).


2 Custom DIY Cameo Necklace Kits RESERVED FOR JEAN

Her interest in the kits, has prompted me to revisit the idea of listing these DIY Necklace Kits. They will include a strand of gemstone beads, matching seed beads, sterling silver findings, stringing wire, a instruction pamphlet with color pictures, as well as an opportunity to receive 20% off the purchase of a pendant with the kit. I'll start listing them soon! However, if you're interested before that, just drop me a convo through my Beach Bum Creations Etsy shop.

Tuesday, September 25, 2007

Goals


Once upon a time I actually worked for a home party company. I was working a full time job that I was unable to get overtime at with really screwy hours. Needless to say, I needed to make some extra cash, but I also needed to be able to make my own hours. It wound up not being for me, but one of the things I learned in that experience is that setting goals really does help you achieve said goals. =) I've admittedly been slacking a lot lately so far as my Etsy businesses go (both Athena's Armoury as well as Beach Bum Creations). Well, not necessarily slacking because the summer was insane with buying a house, packing, moving, repairing, unpacking. Hell, we're still unpacking, repairing, etc., but I've been starting to feel like I have a little bit less pressure and can devote some more time to Etsy.

My goals are simple to start. As organized a person as I am, taking time to take pictures, editing them, and listing items has not been one of my favorite things to do. If I have the time, I'd rather be playing with pliers and creating something. I think that's the case with most people who create. My goal is to take the time to take pictures and hopefully get better at it, so that there will be less time spent editing. With less editing time, I can then create listings while I'm sitting at my desk and bored at work. This will then free up my evenings/weekends to play with pliers. Hopefully, by writing these goals down and posting them here for all to view, I will follow through with them! Wish me luck!

Thursday, July 12, 2007

My Work Space, AKA My Dining Room Table

There are as many unique work spaces out there as there are unique artists who occupy them. Some use their kitchen/dining room table (like me), some their couch and coffee table, some a tray on their lap, some are even lucky enough to have a work bench or even a studio. I love getting a sneak peek into everyone's "studio." I know it's kind of voyeuristic, but I truly love to see how everyone works, get ideas for my own space (if I'm ever lucky enough), see their tools and materials.

For now, my work space is my dining room table. As many of you in a similar situation knows, sometimes you're lucky enough to be able to leave your materials and tools out and set up mid-project. Then there are those times that your boyfriend wants to have his friends over for a full day of gaming. Well, maybe not exactly that situation, but I think you get the idea. Mid-project or not, you have to clean everything up.


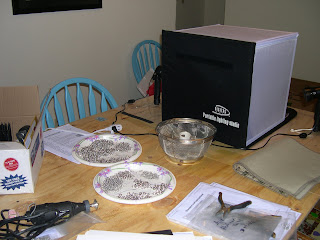
The above photo is of my kitchen table which in actuality is in my dining room, aka my work space. The plain wood table top you see is something that Scott (the boyfriend) built to give us a bigger table space: it's basically a piece of plywood that sits on top of the actual table with a frame so it doesn' t move; it also folds in half for storage. On the bottom left is Scott's Dremel tool which I have kind of pirated away from him to use with my Koil Kutter for cutting jump rings. You can see a batch of freshly cut rings as well as a strainer in which I rinse all of the lube off of them. My Craftsman pliers are out (this pic is obviously from before Scott gave me my beautiful Lindstroms) as well as some mandrels used for coiling. In the background, you can see my light box. This was not one of my more organized days, but then it's always difficult to stay organized in a temporary space.

Here's another shot of my work space. You can see in the background the storage cabinet that Scott and I share and a set of plastic drawers that contain some more jewelry making supplies; my tackle box with even more supplies and tools is on the floor between the two.


On top of the cabinet are two projects: one belonging to me and one belonging to Scott. The grey box laying down is his: it's a dice tower that he built from scratch with wood and felt. You throw dice in and it tumbles them up and then they come pouring out the bottom. It's really quite neat.

The other project is mine, of course: a work in progress coif. In this photo it looks kind of like a wig and I'm thinking of making more like this except in fun colors for all of those punk girls out there. Since this picture has been taken, I've finished it off and must admit, I've been slow to get pictures posted of her all done up.

Scott and I are in the process of trying to buy a house and if any of you have not been through that experience, imagine the most stressful time of your life and multiply it by a thousand. In any event, if all goes well, our new house will have three bedrooms. One of course is for us to sleep, and we were originally planning on having an office for us both in one and a guest bedroom in the other. Recently, we've been playing with a new idea that I think we've both fallen in love with: we're each going to get a room to do with as we please. If we decide to go this route, I'm going to have my own office/studio/workspace!! And then, of course, I'll have to add a new post with more pic's!

Tuesday, July 3, 2007

Etsy Bloggers Street Team Theme: Orange

I've been racking my brain trying to think of a fantastic project I can do using orange jump rings or O-rings, but not having any in stock at the moment put a serious damper on that! But then, I realized that I already have some orange already in both of my shops! I've got some orange pendants in my original Etsy shop, Beach Bum Creations.


But, even more exciting than supplies is something that I've made. Although, not really orange, copper's as close as I've got! You can find this Mobiused Rosette Bracelet in Athena's Armoury, my new shop for chain maille.


That's probably one of my all time favorite bracelets. I made one for myself and always get compliments on it. It was made using 18 gauge copper rings with, I believe, 1/4" inner diameter. It's a variation on the classic Euro 4-1 chain maille weave (most commonly seen in armour).

Cleaning Copper
I've had mine for quite some time now and it's starting to get a little dull, but that's easily fixed. Just mix together some lemon juice and salt, add bracelet, then slosh around a little bit. However, you must make sure you rinse it off!! The salt will make the bracelet crusty if you let it sit and the acid in the lemon juice will eat away at the metal. If you want to make extra certain it's clean of the lemon juice solution and perhaps keep the shine a bit longer, you can make a paste with baking powder and water and rub it on the copper. This will neutralize the acid. Then, of course, rinse again and dry. Beautiful, shiny copper once again!

Monday, June 25, 2007

The Big Move Has Begun

After a somewhat rough patch where there were a lot of bugs and just general wonky-ness going on at Etsy, it seems like things might be stabilizing (for more info check out the link on the right to the Unofficial Etsy News Blog). That said, I'm finally starting to move all of my chain maille from Beach Bum Creations to their permanent home at Athena's Armoury!!

Thursday, June 14, 2007

Metalsmithing Class #2: Starting My Ring!!

Last night I got to start my first official project in my metalsmithing class: a cabochon bezel set sterling silver ring. Susan took out a whole bunch of stones and asked us to pick our favorite. I chose a black mother of pearl, which of course is a shell and not a cabochon (a cabochon, or just cab, is a stone with a flat surface on one side and a round or dome shape on the other). It didn't dawn on me at the time that the lack of surface area might make it a bit more of a challenge to work with. . .

This ring will consist of four parts plus the stone. There is the bezel (which is the metal that holds the stone in place); there is a decorative trim which will be added around the bezel; the sheet metal shaped to be the backing to the stone, bezel, and trim; and the wire which forms the actual ring portion that goes around your finger.

The first two parts (the bezel and the trim), we already know how to make from last week's lesson. As for the challenge I mentioned earlier: with the lack of surface space, the shell kind of moves around a lot. That made it more difficult for me to get an accurately sized and shaped bezel. In addition, the wire used for the bezel is fine silver and not sterling. Fine silver does not have any copper in it and, thus, is very, very soft. I'm used to working with malleable metals (and some not so malleable metals) with my maille, but nothing quite as soft as this, so it took me a little bit of time to get used to working with it.

After a whole bunch of filing and shaping, I had something I thought would work and got down to soldering. I gotta tell ya, the soldering is the easiest part. I love the soldering. Not because of how easy it is, but because it's so cool: there's some metallurgy involved, you get to play with a torch, and, well, the colors of the flame and the metal as it changes is really pretty.

Next, I got to work on my trim. For my trim I chose a half round twisted wire -- it looks really cool. As opposed to the bezel, the trim was much harder (as in the opposite of malleable, not the opposite of easy -- then again, I guess either definition applies). Work hardened from twisting, maybe? So, I was trying to shape a somewhat harder wire around a very soft wire and found myself denting, marring, and misshaping my so nicely formed bezel. Luckily, I should be able to reshape the bezel and, hopefully, the mars will either come out or be hidden by the trim. In my attempts to get two flush edges on a half round twisted wire (I really need to get a picture of this in so you understand) I filed away a little too much wire. I walked up to Susan and showed her my problem. She didn't say that I made a mistake and needed to get some new wire. No. She pulled out this little container and suggested I add a spitball to connect the ends. (A spitball is basically someone else's oops when they melted their metal.) I was so excited! I made a booboo and it's going to turn into something totally cool! My stone/shell and trim are going to be unique, but I also get this additional little something. (She also mentioned that I chose a difficult project because of the shell vs. cabochon thing. Gggrrrrr.)

Well, that's as far as I got last night. Next week, I'll be soldering the trim with my groovy little spitball and moving onto the shank and, hopefully, the wire ring portions. After that, the only thing left to do is set the stone/shell and possibly polish. Susan said that this whole project should take about six to nine hours for a beginner (which equates to two or three classes), about three hours the second time you try, and one hour with experience. So fun!!

Monday, June 11, 2007

What's in a Name?


A very nice fellow Etsian made this banner for me recently. I really love the graphic: the warrior goddess image very much resembles descriptions of Athena with the deep set eyes, long neck, the nose extending from the forehead, and her helmet worn high on her head like a hat.

When I first opened shop at Etsy, like so many others, I had numerous projects going on and wanted to keep the name somewhat ambiguous to apply to both myself and the many things I was doing. As I've become more and more obsessed with chain maille, I've decided to open up a second shop solely for my maille with a name I found to be more appropriate to the art.

Many people know of Athena as a goddess of war and wisdom. What many people don't know is that she's also the patroness of crafts; among them, metal-working: seemed like a good fit for my shop.

So far as the armoury part of the shop name goes: well, let's face it, chain maille is armour. Whether it be combat or costume armour or jewelry made using the same weaves, it's all still based on the armour of long ago.

I'm about to start transferring my chain maille items from http://BeachBumCreations.etsy.com to http://AthenasArmoury.etsy.com!! Beach Bum Creations will still exist for other kinds of jewelry, supplies, candles, hemp, etc., but all maille will be in Athena's Armoury.

Thursday, May 24, 2007

So Many Pursuits, So Little Time. . .

Welcome to Athena's Armoury!! I'm so excited to be starting so many new things right now: this blog, my second Etsy shop, a new flickr account, and I've even signed up for a new metal jewelry class being offered at my local fine art center.

Blogspot
OK, this being a brand new blog, bear with me as I add stuff, play, and make it fun. I'm looking forward to meeting so many interesting people through this venue


Etsy
I already have one Etsy shop:
http://beachbumcreations.etsy.com. I opened it almost a year ago and was doing a lot of, well, beachy stuff at that time. I was making hemp jewelry, macramé stuff (like belts, grocery bags, coasters), candles, fan pulls, etc. I hadn't really been including any of my other jewelry pursuits at Beach Bum, but when it started taking over more and more, I decided it was time to do something about it. I was teaching beading and wire wrapping at home parties for a little while, but my obsession with chain maille was pretty much taking over. Thus, the second Etsy shop with a name much more appropriate to chain maille: http://AthenasArmoury.etsy.com.

flickr

http://flickr.com/photos/athenasarmoury/
flickr, too, is a work in progress. I've got some of my chain maille pieces up and have started to join some groups based on metal, jewelry, crafts, and, of course, chain maille and Etsy! I've also added a couple of personal pic's, so you can see me, my wonderful boyfriend, and my best friend who I don't get to see enough of.

Metal Jewelry Class
First of all, I'm one of those dorky people who love learning and taking classes (as long as there's no homework or exams, anyway) and, obviously, I love jewelry. I am so excited about this class! Yes, I get to use power tools when I make my rings for my maille, but I get to work with all kinds of goodies in this class including a torch. I'll be soldering, making woven chains, hinges, boxes, fold forming, granulation, fusing, and mokume gane. Did I mention I was excited?


With so much going on, I hope to continue to posting updates with all kinds of exciting news!